
The best hikes in Whistler BC with honest RV and campervan parking notes for every trailhead. From easy walks to challenging alpine routes — plan your Whistler hiking trip from your home on wheels.
Whistler isn’t just one of the best ski resorts in the world — in summer it transforms into one of the most incredible hiking destinations in British Columbia. With trails ranging from easy lakeside walks to full-day alpine adventures, there’s something here for every ability level.
The good news for RV and campervan travelers is that most of Whistler’s best hikes are very accessible — and if you’re already parked up in Day Lot 3’s oversized vehicle area in the village, several excellent trails are within walking distance or a short drive. No need to move your rig at all.
This guide covers the best hikes in Whistler for RV travelers — with honest notes on trailhead parking for every size of rig, so you can spend less time worrying about where to park and more time on the trail.
A Note on Parking in Whistler Village
Before we get into the hikes, a quick reminder — if you’re basing yourself in the village, the Day Lot 3 Oversized Vehicle Area on Blackcomb Way is your designated RV parking spot. At $39/day it’s not cheap, but it’s legal, stress-free and perfectly positioned for accessing several trails directly from the village. Read our full Whistler RV parking guide for everything you need to know before you arrive.
1. Train Wreck Trail — Easy | 5km return
Difficulty: Easy Time: 1.5–2 hours Elevation: Minimal
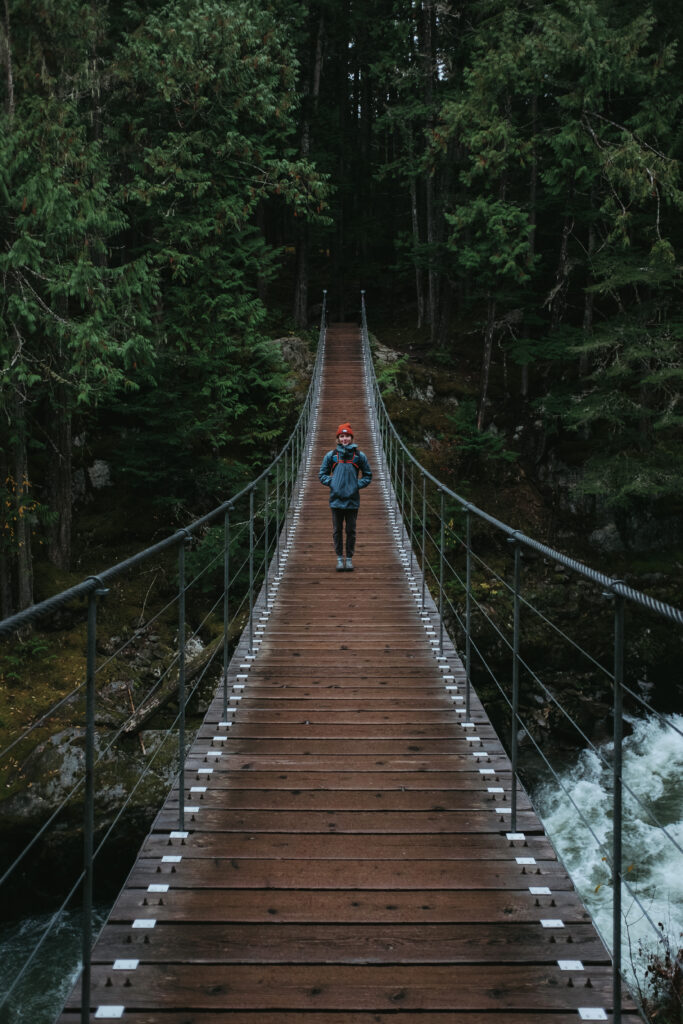
This one is a Whistler classic and genuinely unlike anything else on the corridor. The Train Wreck trail leads through beautiful old-growth forest to a collection of abandoned, heavily graffitied train cars that derailed here decades ago — now one of the most photographed spots in the Sea to Sky. Artists from around the world have painted the wrecks over the years and the result is a surreal, colourful installation in the middle of the rainforest. It’s brilliant.
The trail is flat and easy, crossing a spectacular suspension bridge over the Cheakamus River before reaching the wrecks. Allow extra time to explore — most people spend longer here than they expect.
Parking: The trailhead is accessed from the Cheakamus Crossing neighbourhood in Whistler. Park in the Cheakamus Community Forest parking area off Jane Lakes Road. The gravel lot is wide and flat with good space for motorhomes — several travellers have confirmed this works for rigs up to 40ft. Arrive early on summer weekends as it fills up. No fee.
RV Parking: Motorhomes and campervans of all sizes
Getting there: From Whistler Village head south on Highway 99, turn left onto Cheakamus Lake Road then right onto Jane Lakes Road. The parking area is on the left. Get directions →
2. Lost Lake Loop — Easy | 5.5km loop
Difficulty: Easy Time: 1.5–2 hours Elevation: Minimal
Lost Lake is one of those places that feels like Whistler’s best kept secret — a peaceful forested lake just a short walk from the village buzz with swimming, paddling and picnic spots around every corner. The loop trail winds around the full perimeter of the lake through birch and cedar forest, passing the sandy beach and several quiet coves along the way.
On a hot summer day the swimming here is brilliant — the lake warms up nicely by July and August. It’s also a beautiful walk in spring when the forest floor is covered in wildflowers.
The best part for RV travelers? You don’t need to move your rig at all — the trail is accessible directly from Whistler Village on foot.
Parking: No dedicated trailhead parking — access the trail on foot from the village. Park at Day Lot 3 Oversized Vehicle Area (Blackcomb Way) and follow the Valley Trail signs south toward Lost Lake. It’s approximately a 10-15 minute walk from the parking lot to the lake entrance. No need to move your RV.
RV Parking: Park at Day Lot 3 in the village — no separate trailhead parking needed
Getting there: Walk south from Whistler Village on the Valley Trail. Follow signs for Lost Lake Park. Get directions →
3. Brandywine Falls — Easy | 1.5km return
Difficulty: Easy Time: 30–45 minutes Elevation: Minimal
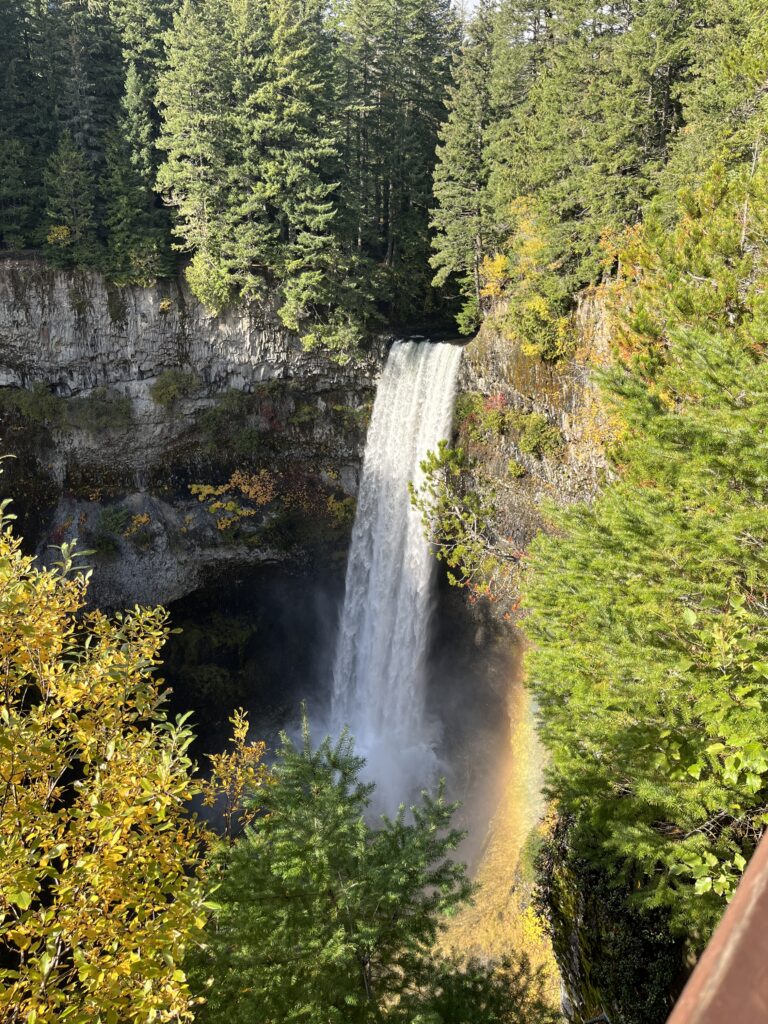

At 70 metres high, Brandywine Falls is one of the most dramatic waterfalls in the Sea to Sky corridor — a single powerful drop off a volcanic rock ledge into a pool below, framed by mountains and old-growth forest. The short trail from the parking lot leads to a viewing platform right at the edge — genuinely jaw-dropping views with very little effort required.
There’s also a longer optional loop (about 4km total) that takes you down into the canyon for a closer look and connects to the Sea to Sky Trail. Worth doing if you have the time.
Brandywine Falls is about 10km south of Whistler — an easy and very worthwhile stop whether you’re arriving into the area or heading back south.
Parking: Brandywine Falls Provincial Park has a large, well-maintained parking lot right off Highway 99 with plenty of space for motorhomes and larger rigs. One of the best trailhead parking situations in the Whistler area — wide, flat and easy to manoeuvre in. No fee for day use. Gets busy on summer weekends so aim to arrive before 10am.
RV Parking: All sizes including large motorhomes and trailers
Getting there: Heading south from Whistler on Highway 99, the Brandywine Falls Provincial Park turnoff is clearly signed on the right, approximately 10km south of the village. Get directions →
4. Nairn Falls — Easy | 3.5km return
Difficulty: Easy Time: 1–1.5 hours Elevation: Minimal
Nairn Falls is a hidden gem that most people drive straight past on the way to Pemberton — and that’s a shame because it’s one of the best short hikes in the entire corridor. The trail follows the Green River through beautiful old-growth forest to a dramatic series of falls where the river churns through a narrow canyon over a series of rocky drops. The total drop is around 60 metres and the sound alone is worth the walk.
It’s a peaceful, relatively quiet trail compared to the busier spots around Whistler Village — and the forest section is lovely regardless of season. A great option for an easy morning hike before continuing north to Pemberton or heading back south.
Parking: Nairn Falls Provincial Park has a dedicated parking lot off Highway 99 with good space for most RV sizes. Wide entrance, flat gravel surface and room to turn around comfortably. No fee for day use. The campground here is also one of the better budget options near Whistler — see our campground directory for details.
RV Parking: All sizes up to 32ft. Large Class A motorhomes — assess the lot on arrival.
Getting there: On Highway 99, approximately 28km north of Whistler Village and 3km south of Pemberton. The park entrance is clearly signed on the left. Get directions →
5. Singing Pass Trail — Challenging | 20km return
Difficulty: Challenging Time: 6–8 hours (full day) Elevation: 1,100m
If you want a serious full-day mountain hike from Whistler, Singing Pass is one of the best. The trail climbs steadily from the valley floor up through old-growth forest, past Harmony Lake and into the stunning alpine meadows of Singing Pass — a high, wide bowl surrounded by dramatic peaks with wildflowers everywhere in late July and August. It’s one of those hikes where you look around at the top and feel genuinely lucky to be there.
The route starts at the Whistler Gondola bus loop at the base of Whistler Mountain — no gondola ticket required, you hike the whole way up. That said, it is a big day — 20km return with over 1,100m of elevation. Start early, pack plenty of food and water and bring warm layers for the alpine section even in summer.
Parking: Start from Whistler Village and park at Day Lot 3 Oversized Vehicle Area. The trailhead is a short walk from the gondola base at the south end of the village. No need to move your rig — just park up for the day and set off on foot. This makes it one of the easiest hikes logistically for RV travelers based in the village.
RV Parking: Park at Day Lot 3 — no separate trailhead parking needed
Getting there: Walk to the Whistler Gondola base at the south end of the village. The Singing Pass trailhead is signed just before the gondola ticket office. Get directions to Day Lot 3 →
6. Blackcomb Mountain Ascent — Very Challenging | 14km return
Difficulty: Very Challenging Time: 5–7 hours Elevation: 1,600m
Not for the faint-hearted — but if you’re looking for an epic physical challenge with extraordinary views, the Blackcomb Mountain Ascent delivers. The trail climbs from the Blackcomb base all the way to the Rendezvous Lodge area near the top of the mountain — 1,600m of elevation over 7km. The views from the top across Whistler Valley, the Tantalus Range and the Coast Mountains are absolutely spectacular.
This is a serious mountain hike. Poles are recommended, the trail is steep and exposed in the upper sections, and the weather can change fast. That said, if you’re fit and prepared it’s a genuinely rewarding day out that very few visitors to Whistler ever do — most people just take the gondola up.
Parking: The Blackcomb base is easily accessible from Whistler Village — park at Day Lot 3 Oversized Vehicle Area and walk to the Blackcomb base (approximately 10-15 minutes from the parking lot). No separate trailhead parking needed.
RV Parking: Park at Day Lot 3 — no separate trailhead parking needed
Getting there: Walk from Whistler Village to the Blackcomb gondola base. The hiking trail starts just to the left of the gondola building. Get directions to Day Lot 3 →
7. Whistler Mountain Gondola Hikes — Various Difficulties
Gondola cost: Adult tickets from ~$59 CAD (check Whistler Blackcomb website for current prices) Parking: Day Lot 3 Oversized Vehicle Area ✅
If you want big mountain views without the big climb, the Whistler and Blackcomb gondolas open up an entirely different level of hiking — straight into the alpine from a standing start. You ride up, step out and you’re already above the treeline with a network of trails in every direction.
It costs money — gondola tickets aren’t cheap — but for RV travelers who want genuine alpine experiences without committing to a full-day ascent hike, it’s one of the best value days out in Whistler. And the parking situation couldn’t be simpler: Day Lot 3 Oversized, walk to the gondola base, done.
The best trails from the top:
High Note Trail
Difficulty: Moderate | Distance: 9km loop | Time: 3–4 hours
The signature summer hike from the top of Whistler gondola — a spectacular ridgeline loop with non-stop views of Black Tusk, Cheakamus Lake and the surrounding peaks. The trail traverses high alpine terrain above 1,800m with wildflowers, glaciers and mountain views the whole way. One of the best day hikes in BC if conditions are good. Take the Peak Chair from the gondola summit to access the start of the trail.
Musical Bumps
Difficulty: Moderate | Distance: 12km one way | Time: 4–5 hours
A longer ridge walk that follows the Whistler Mountain ridgeline south from the gondola summit, crossing Piccolo, Flute and Oboe summits before dropping down to Singing Pass and back into the valley. Can be done as a loop with Singing Pass Trail — a big but brilliant full-day option for experienced hikers.
Blackcomb Alpine Loop
Difficulty: Moderate | Distance: 5km loop | Time: 2 hours
A shorter, more accessible option from the top of the Blackcomb gondola — a loop through alpine meadows with views of Horstman Glacier and the surrounding peaks. Good option if you want alpine scenery without a long commitment. The Overlord Trail extends this further for those who want more distance.
Gondola parking note: For all gondola hikes, park at Day Lot 3 Oversized Vehicle Area and walk to the gondola base (10-15 minutes). Make sure you check the last gondola download time before heading up — you don’t want to be stuck at the top if you’re taking longer than expected. Download times are posted at the gondola base and on the Whistler Blackcomb app.
Quick Reference Guide
| Hike | Difficulty | Distance | RV Parking |
|---|---|---|---|
| Train Wreck | Easy | 5km | ✅ All sizes |
| Lost Lake Loop | Easy | 5.5km | ✅ Day Lot 3 |
| Brandywine Falls | Easy | 1.5km | ✅ All sizes |
| Nairn Falls | Easy | 3.5km | ✅ Up to 32ft |
| Singing Pass | Challenging | 20km | ✅ Day Lot 3 |
| Blackcomb Ascent | Very Challenging | 14km | ✅ Day Lot 3 |
| Gondola Hikes | Moderate–Hard | Various | ✅ Day Lot 3 |
Tips for Hiking in Whistler from Your RV
Start early on summer weekends. Day Lot 3 fills up fast on busy days and the trailheads for Brandywine and Train Wreck can be packed by mid-morning. Aim to be parked and walking by 8-9am.
Check the gondola last download time. If you’re heading up on the gondola, always check what time the last car comes down before you set off on a longer trail. It’s posted at the base and on the Whistler Blackcomb app.
Book your campground before you arrive. If you’re staying overnight near Whistler, campgrounds fill up fast from June onwards. Check our Whistler campground options and book ahead.
Pack for mountain weather. Even in July and August, conditions above the treeline can change quickly. Always carry a waterproof layer, extra food and water and warm layers for any alpine hike.
Bear spray is essential. Bears are active throughout the Whistler area in summer and fall. Carry bear spray on every trail and know how to use it — this isn’t optional in the Sea to Sky.
Respect the Day Lot 3 24-hour limit. If you’re doing a big hiking day and staying overnight, you’ll need to be in a campground — you can’t sleep in your vehicle in the Day Lot. Plan your overnight accommodation separately.
Where to Base Yourself for Whistler Hiking
The best campground options for a Whistler hiking trip:
- Whistler RV Park & Campground — full hookups, 15/30/50amp, closest to the village. Book early. View listing →
- Riverside Resort Whistler — well-maintained Parkbridge property, restaurant on site. View listing →
- Cal-Cheak Recreation Site — budget option, $18/night, beautiful forest setting 13km south. View our free camping guide →
- Nairn Falls Provincial Park — 20 minutes north near Pemberton, dry camping only, max 32ft. View listing →
FAQs
Can I hike in Whistler without taking the gondola? Yes — several of Whistler’s best hikes don’t require a gondola ticket at all. Train Wreck, Lost Lake, Brandywine Falls, Nairn Falls, Singing Pass and the Blackcomb Ascent are all accessible without paying for a lift. The gondola hikes are a great option if you want alpine access without a long climb, but they’re not essential.
Where do I park my RV for hiking in Whistler? For most village-based hikes, park at the Day Lot 3 Oversized Vehicle Area on Blackcomb Way ($39/day, 24-hour max). For Brandywine Falls and Nairn Falls, both have their own dedicated parking lots off Highway 99 with good space for most RV sizes. For Train Wreck, park at the Cheakamus Community Forest lot off Jane Lakes Road.
What is the easiest hike in Whistler? Brandywine Falls is the easiest — just 1.5km return on a flat, well-maintained path to a spectacular 70-metre waterfall. The parking lot is excellent for RVs and it makes a great quick stop whether you’re arriving into Whistler or heading home.
When is the best time to hike in Whistler? Late June through September is the best window for most trails. The gondola hikes and high alpine routes like High Note and Musical Bumps are best from mid-July when the snow has cleared. Brandywine Falls, Nairn Falls, Lost Lake and Train Wreck are accessible and enjoyable from May onwards.
Is Whistler good for hiking with an RV? Absolutely — Whistler is one of the best RV hiking destinations in BC. The Day Lot 3 oversized vehicle area gives you a central base for village trails, and several of the best hikes in the area (Brandywine Falls, Train Wreck, Nairn Falls) have their own large trailhead lots suitable for motorhomes. See our full Whistler RV parking guide for everything you need to know.
Heading further south? Check out our guide to the best hikes in Squamish for RV travelers — the same format with honest parking notes for every trail.
Browse all RV-friendly campgrounds and services on the Sea to Sky corridor.
Comments